Configuring Project Settings
Do you find this article helpful? Help us improve by sharing feedback: Give Feedback
About
For an overview, watch the video below (until the 1:25 mark). For details, consult the following written information.
Accessing Project Settings
Go to Settings ![]() , then Project.
, then Project.
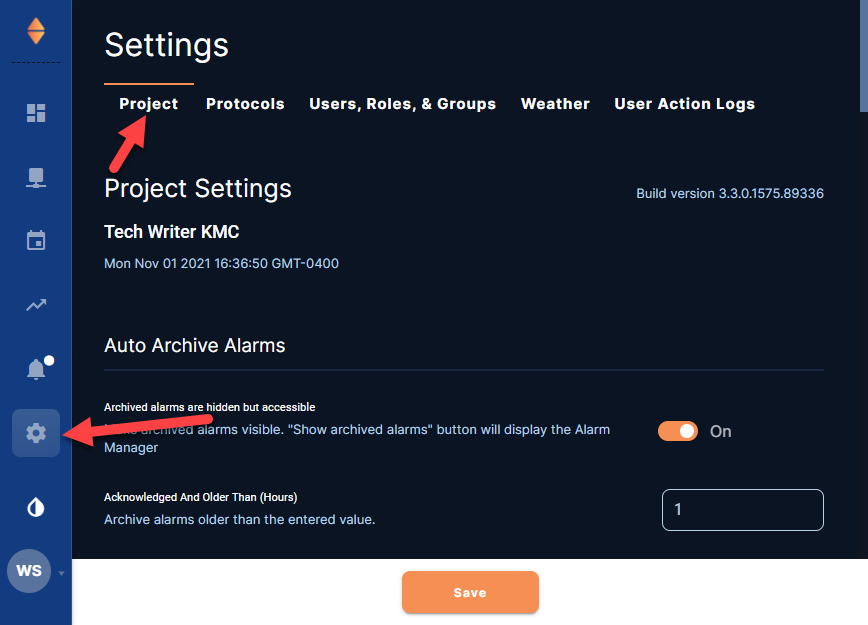
Under the Project Settings header
The name and time zone of the project (as set in the KMC Commander license server) shows here.
Auto Archive Alarms
-
Choose whether or not to auto archive alarms. If you choose On:
-
Alarms that are acknowledged in Alarm Manager will be archived after the number of hours (1 minimum) entered in Acknowledged and Older Than (Hours).
-
All alarms, whether acknowledged or not, will be archived after the number of days (1 minimum) entered in Any Alarm Older Than (Days).
-
Archived alarms can be hidden or viewed. (See Finding, Viewing, and Acknowledging Alarms.)
-
-
Select Save.
Dashboard
Point ID Column from Card Detail
-
Choose to either Show or Hide the Point ID column from the backs of cards on dashboards.
-
Select Save.
Dashboard Deck Mode
-
From the dropdown menu, select the default view mode for decks on dashboards.
Note: Individual decks can be changed from the default to another view mode (see Switching Between Deck View Modes) However, whenever a dashboard reloads, the decks will return to this default. Also, when you add a deck to a dashboard it will appear in this view mode.
-
Select Save.
Read Time After Point Writes (Seconds)
The value entered here is the seconds interval after the system writes a point that it will read the new value.
Note: Typically the system writes to a point within half a minute (depending on network speed and other factors), but a read confirmation of the successful write (e.g., a setpoint displayed on a card changes from the old value to the new value) may take several minutes. If errors are occurring when reading, adding an extra time interval may help reduce errors.
-
If desired, enter a custom interval (in seconds).
-
Select Save.
Display Point Override
-
Choose whether an indication should display on cards that a point is in override. If you choose On:
-
A border (together with a hand icon), colored the Point Override Color, will appear around the slot of an overridden point.
-
Hovering over the point's name will cause information about the override to appear.
Note: The override indication will display when a point's value is written at the same or higher priority than the Default Manual Write Priority setting, found in Settings
 > Protocols.
 -
-
Select Save.
Point Override Color
-
If Display Point Override is On, do one of the following to choose a color for the override indication:
-
Select a color, using the color selector square and slider.
-
Enter the desired color's hex code in the text box.
Note: To revert the color back to the default (deep pink) color, select the "here" in the tip text.
-
-
Select Save.
Fixed Dashboard Width
The default setting is Auto (i.e. responsive) — dashboard element arrangements shift for different sized device screens and browser windows. Setting the width to a fixed number of columns can help dashboard elements to remain in intentional arrangements.
To set a standard fixed with for all existing and new dashboards.
-
From the dropdown menu, select the desired number of columns, or enter the number.
Note: A column is the width of one medium-sized card (for example, one Weather card).
-
Select Save.
Note: A Dashboard Width set for an individual dashboard overrides the Fixed Dashboard Width set here. (See Setting a Dashboard's Width.)
Note: Elements on an preexisting dashboard without an individually set Dashboard Width may shift from an intended arrangement to accommodate the new Fixed Dashboard Width.
Note: A left-right scroll bar will appear for dashboards on narrower screens and browser windows.
Measurements
-
From the dropdown menu, select the default unit type (Metric, Imperial, or Mixed) to use for displaying point values on cards, trends, etc.
-
Select Save.
Security
Session Inactivity Timeout
-
From the dropdown menu, select the duration of time that no activity can be detected before requiring a login again.
Note: None means that the session will never timeout due to inactivity.
-
Select Save.
Minimum password length required
-
Enter the desired minimum number of characters to require for a password.
-
Select Save.
Running Jobs
Running Jobs is a diagnostic tool showing a snapshot of any current processes. Most processes are completed within a few minutes. During initial discovery of a large network, processes may last considerably longer. Any job that lasts more than a few hours, however, is probably stuck.
Canceling a “stuck” or pending job (from app.kmccommander.com)
-
Select Delete
 next to the running job.
 -
In the Delete Running Job dialog, select Reboot and Delete.
Note: A countdown timer appears for 2 minutes and 30 seconds in an orange box at the bottom of the screen (over the Save button) while the KMC Commander gateway reboots.
Note: To access the Save button during the reboot process, you can close the countdown timer. The reboot process will still continue.
-
If you need to cancel more running jobs, select Delete
next to them.Note: If deleted during the 2 minutes and 30 seconds that the gateway is rebooting, the jobs will delete without needing to confirm.
Gateway Information
| Element | Meaning / Additional Information |
|---|---|
|
Box Service Tag |
Matches the service tag number found on the bottom of the gateway of the project currently accessed. It is the last seven digits, after "CommanderBX". |
|
Last logged communication time |
Shows the time of the last logged communication at the time that the web browser loaded the page. |
|
Data usage |
Shows the year and month (the last complete month) for which data usage information is displayed, as well as the amount of received data (RX) and transmitted data (TX) in gibibytes (GiB). |
|
Reboot Gateway |
Selecting Reboot Gateway initiates rebooting of the KMC Commander gateway. A timer counts down for 2 minutes and 30 seconds, during which Reboot Gateway is unavailable. Note: The gateway must have a Cloud connection to perform a remote reboot. |
License Information
| Element | Meaning / Additional Information |
|---|---|
|
Name |
The project name associated with the license in the KMC Commander license server. |
| Expiration Date |
|
| Automated Billing | Contact a KMC Controls sales representative or customer service to turn automated billing on or off. See Contact Information.) |
| Licensed Points | The maximum number of points of interest that can be trended and/or written to by KMC Commander under the current license. |
| Used Points | The number of data points currently configured to be trended and/or written to by KMC Commander as points of interest. |
System Integrator
The name of the System Integrator associated with the project in the KMC Commander license server displays here.
Enabled Addons
A list of the add-ons (extra features) purchased for this license displays here. (See Add-ons (and Data Explorer).)
We value your feedback!
Help us improve this article: Click here to take a 3-minute survey. Your input helps us make our articles clearer and more useful.