Configuring Protocol Settings
Do you find this article helpful? Help us improve by sharing feedback: Give Feedback
About
For an overview, watch the video below (until the 2:06 mark). For details, consult the following written information.
Accessing Protocol Settings
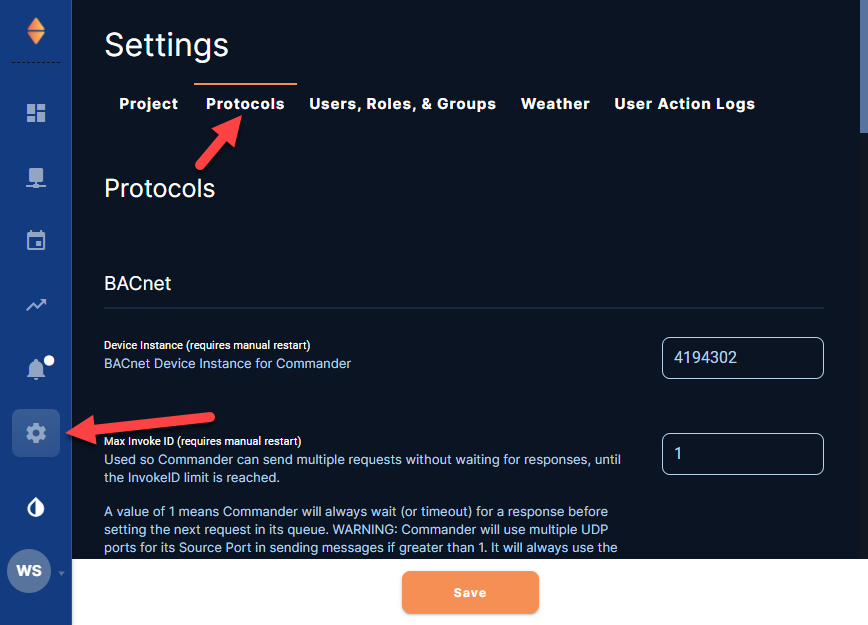
Go to Settings ![]() , then Protocols.
, then Protocols.
Individual Point Intervals
The Point Update Wait Interval (Minutes) determines the default trending frequency for all points of interest in the project. However, project needs may require some points to trend at a lower or higher frequency. For those cases, you can configure Low, Medium, and High options (independent of the Point Update Wait Interval). When Assigning Device Profiles or Editing a Device Profile, you can then select the Low, Medium, or High option from a Trending Frequency drop-down menu for the required points.
Low
Low configures the Low option of the Trending Frequency drop-down menu (found when Assigning Device Profiles).
-
Enter the longer interval (in minutes) at which some points in the project need updated (polled).
Note: The longest interval allowed is 60 minutes.
-
Select Save.
Medium
Medium configures the Medium option of the Trending Frequency drop-down menu (found when Assigning Device Profiles).
-
Enter the medium interval (in minutes) at which some points in the project need updated (polled).
Note: Medium is independent of the Point Update Wait Interval (Minutes) (the default point polling interval for all points of interest in the project).
-
Select Save.
High
High configures the High option of the Trending Frequency drop-down menu (found when Assigning Device Profiles).
-
Enter the shorter interval (in minutes) at which some points in the project need updated (polled).
Note: The shortest interval allowed is 0.5 minutes.
-
Select Save.
BACnet
Device Instance
The device instance of the local KMC Commander gateway can be changed here.
Note: A manual restart is required for a change to take effect.
To change the device instance:
-
Enter a new device instance.
-
Select Save.
Max Invoke ID
The KMC Commander gateway uses the Max Invoke ID to send multiple requests without waiting for responses, until the Invoke ID limit (the entered value) is reached.
Note: A value of 1 means the KMC Commander gateway will always wait (or timeout) for a response before setting the next request in its queue.
Caution: The KMC Commander gateway will use multiple UDP ports for its Source Port in sending messages if greater than 1. It will always use the configured UDP port to talk to devices, but will use different UDP ports to receive the responses. These ports start with 47808 and go up consecutively. Do not set Invoke ID to anything greater than 1 if your firewall blocks these ports.
To change the Max Invoke ID (from the default of 1):
-
Enter a new value (1 to 5 maximum requests).
-
Select Save.
Read Priority Array Wait Interval (Minutes)
The Read Priority Wait Interval is the time between updates (polling) of priority array values.
Note: This interval affects how quickly an indication that a point is in override might display on cards. (See Display Point Override in Settings ![]() > Project.) It also affects how up-to-date Manual Override reports will be. (See Configuring a Manual Override Report.)
> Project.) It also affects how up-to-date Manual Override reports will be. (See Configuring a Manual Override Report.)
To change the Read Priority Array Wait Interval (from the default of 60 minutes):
-
Enter a new value (0 to 180 minutes).
Note: Setting to 0 will disable the priority array reading daemon (background polling process) and values will not update.
-
Select Save.
BACnet/Niagara
Point Update Wait Interval (Minutes)
The Point Update Wait Interval is the default time between updates (polling) of points on trends, alarms, and any reads through an API.
To change the Point Update Wait Interval (from the original default of 5 minutes):
-
Enter a new value (1 to 60 minutes).
-
Select Save.
Note: Niagara settings can take up to 15 minutes to take effect.
Manual Write Timeout
Manual Write Timeout sets the default choice of duration for any manual overrides made of setpoints or other objects on dashboards.
Note: The default duration is Permanent, meaning manual overrides will continue indefinitely until the next schedule change or manual override occurs.
To set the Manual Write Timeout :
-
Select the manual override duration (15 minutes to 1 week) from the dropdown list.
-
Select Save.
Note: Niagara settings can take up to 15 minutes to take effect.
Default Manual Write Priority
Default Manual Write Priority sets the default BACnet priority choice used to write manual changes from the dashboard.
To change the Default Manual Write Priority (from the default of 8):
-
Enter a new BACnet priority value.
-
Select Save.
Note: Niagara settings can take up to 15 minutes to take effect.
Schedule Write Priority
Schedule Write Priority is the BACnet priority used to write normal (i.e., not holiday) schedule events.
Note: If KMC Commander schedules will be used to control devices, this value must be higher than the default schedule write priority values in the controlled devices. (See Managing Schedules and Events.)
To change the Schedule Write Priority (from the default of 16):
-
Enter a new BACnet priority value.
-
Select Save.
Note: Niagara settings can take up to 15 minutes to take effect.
Holiday Schedule Write Priority
Holiday Schedule Write Priority is the BACnet priority used to write holiday schedule events.
Note: If KMC Commander schedules will be used to control devices, this value must be higher than the default schedule write priority values in the controlled devices. (See Managing Schedules and Events.)
To change the Holiday Schedule Write Priority (from the default of 15):
-
Enter a new BACnet priority value.
-
Select Save.
Note: Niagara settings can take up to 15 minutes to take effect.
Override Schedule Write Priority
Override Schedule Write Priority is the BACnet priority used to write override schedule events.
To change the Override Schedule Write Priority (from the default of 8):
-
Enter a new BACnet priority value.
-
Select Save.
Note: Niagara settings can take up to 15 minutes to take effect.
KMDigital
Note: KMC Commander supports KMDigital through use of a KMD-5551E translator.
Manual Write Priority (KMD Devices)
This is the priority used to write manual changes from the dashboard to KMDigital devices through the translator.
Note: KMDigital controllers have only manual or auto write “priorities.” The translator enables a virtual priority array on the KMDigital device points by mapping them inside the translator. Auto (priority 0) is the default behavior for KMDigital, and setting any other priority will write to the KMDigital device in manual mode. See the “Translation concepts” section in the KMD-5551E translator’s application guide for more information.
To change the Manual Write Priority (from the default 0 [Auto]):
-
Enter a new priority value.
-
Select Save.
Schedule Write Priority (KMD Devices)
This is the priority used to write schedule events to KMDigital devices through the translator.
Note: KMDigital controllers have only manual or auto write “priorities.” The translator enables a virtual priority array on the KMDigital device points by mapping them inside the translator. Auto (priority 0) is the default behavior for KMDigital, and setting any other priority will write to the KMDigital device in manual mode. See the “Translation concepts” section in the KMD-5551E translator’s application guide for more information.
To change the Schedule Write Priority (from the default 0 [Auto]):
-
Enter a new priority value.
-
Select Save.
Miscellaneous
Shorten JACE Format Point Names
-
For Niagara Networks, choose whether or not to automatically shorten JACE format point names:
-
If turned Off, each point name read from a JACE can be extremely long and include a variety of additional device information.
-
If turned On, (the default) the name shortens to just the names of the points themselves (i.e. the third-to-last and last segments of the object name).
-
-
Select Save.
SNMP MIB Files
To upload a MIB file for SNMP devices:
-
Select Upload.
-
In the Upload SNMP window, select Choose file.
-
Locate the MIB file.
-
Select Upload.
We value your feedback!
Help us improve this article: Click here to take a 3-minute survey. Your input helps us make our articles clearer and more useful.